Wednesday, September 25, 2013

Oatmeal-Coconut Chocolate Chip Cookies

       There comes a time in life that we all need a little comfort.  Sometimes work gets to you, sometimes you miss your family, sometimes you take an unexpected financial hit, and sometimes it just because the days are getting shorter and you like the sun. We all need comfort for different reasons, but in the end something warm and reminiscent of good things can change the way you feel on any given day. Personally, it is one of the reasons I like hugging so much. It is like a warm, gooey, happy wrapping of love around me, and it makes me smile.
       With this, I would propose that cookies are the hugs of the baking world. I mean really, aren't they just warm, gooey, happy wrappings of love in your mouth, sliding sweetly down to your stomach to spread the comfort of home on even your worst of days? Yes...I think we should all make an effort to give more hugs and eat more cookies. It seems like a happier life.
      I had a friend the other day comment how cookies aren't "good" for you in the nutritional sense, but a chocolate chip cookie is definitely good for you. Its good for your soul, and that is an equally important part of the self to pay attention to. So when you eat a cookie, please for the love of pastry, do not feel guilty. Instead, feel happy that you are doing something for your soul that day. Maybe it will even inspire you to pass on a hug...and then you are doing some good for the soul of society.
            Wow--Boulder Butter just got super deep, you may say. You may also say, "Alright, that is all nice and good, Maisie, but what is this comforting cookie you are proposing I eat?" Well, I propose more than just eating your cookie today. I think when we make our own food, the soul-soothing vibes increase even more. So today is definitely the day for you to get out your cookie sheets, flour, sugar, and definitely, most definitely butter to make Oatmeal-Coconut Chocolate Chip Cookies. Reminiscent of both the most classic cookies from home, Oatmeal Raisin and Chocolate Chip, these have the best of both worlds. Plus, the coconut contributes a delicious chewy sweetness. And they are buttery. Oh so buttery. How I love buttery. Chewy in the middle and crispy on the edges, these decadent yet simple treats provide that dose of homey comfort we all need once in a while. I reckon they belong in your belly along with a glass of milk very, very soon!
Oven Temp: 350 F

Ingredients:
1 1/4 C All-Purpose Flour
1/4 + 1/8 TSP Baking Soda (at high altitude)*
1/4 TSP Fine Grain Salt
1 TSP Ground Cinnamon
1/4 TSP Ground Nutmeg
1/4 TSP Ground Cardamom
1/2 lb. (2 Sticks) Unsalted Butter, room temp.
1 C. Granulated Sugar
1/2 C Packed Light Brown Sugar
2 Large Eggs, room temp.
1 TSP Vanilla Extract
2 1/4 C Old-Fashioned Rolled Oats
1/2 C Sweetened Shredded Coconut
1 2/3 C Chocolate Chips
*At sea level, use 1/2 TSP Baking Soda

Instructions:
1. In a medium bowl sift together flour, baking soda, salt, cinnamon, nutmeg, and cardamom.
2. In a large bowl with a hand mixer, or in the bowl of a stand mixer, beat butter to a lightly creamed state; add white sugar and continue to cream the two together; finally add brown sugar in the same fashion. The process should take 3-5 minute and will result in a light colored mixture with a fluffy texture.
3. Beat in eggs, one at a time, until incorporated.
4. Beat in vanilla extract.
5. Optional: Combine oats and coconut in bowl of food processor and pulse a few times to break down some of the pieces into smaller bits.
6. Add coconut and oats to wet mixture and mix until just combined.
7. In 2-3 additions, add in the flour mixture until just combined.
8. Remove bowl from mixer and switch to a rubber spatula. Scrape down sides of bowl and work around bottom to make sure ALL excess flour is incorporated.
9. Fold in chocolate chips.
10. Transfer dough to an airtight container or zip lock bag and put dough in the fridge to chill overnight (8-24 hours of rest time for best results).
11. Remove dough, and allow it to come up to a temperature you are able to scoop it out into balls. Meanwhile, preheat oven.
12. Form even 1in balls, place them equidistance apart on a cookie sheet and press down lightly with a spoon or fingers.
13. Bake for 9-12 minutes until edges are golden brown.
14. Allow them to cool on a rack and then enjoy the crispy, chewy delights you have just made! Then give someone a cookie and a hug. 


Wednesday, September 18, 2013

White Cheddar Cheese Crackers

          A few posts back I mentioned to you guys how excited I am to live in my new apartment in Denver. Part of that is because of a significantly superior kitchen, part of that is because it is my first place out of college and yes, part of that may now be because of a small herd of kitties living in our back parking lot. However, an even bigger part is my wonderful roommate Jess.
       Recently, Jess mentioned her mom's annual ladies summer cocktail night coming up, and I was stoked to get to join in this year. I had heard tales of the mojitos for the inaugural night, the three types of sangria the second, and this year was dedicated to a delicious drink called a tequila daisy. Even in Colorado's massive rainstorms of last week, this drink only brought happy thoughts of summer. Tequila, hard lemonade, lime juice, and grenadine encapsulated a ladies summer cocktail evening pretty darn perfectly. 
         We each brought things to contribute. There were homemade cumin-pickled zucchinis and smoked salmon on blue corn tortilla chips with a spiced aioli (I will tell you the words you were looking for: "yummy" and "jealous"). Seriously tempting food floated around the kitchen counter as we hung out sipping on our beverages crafted by our wonderful host, Sue.    
          When I was deciding what to bring, I figured I had made enough sweets in my oven recently (ha...that does not actually ever happen) so it was time to brake out a savory baked treat. And anyways, what person does not love cheez-its? They are crunchy, buttery, salty, and most importantly cheesy
         I was ready to take the party cracker to the next level: homemade white cheddar crackers with subtle hints of spice, herbs and salt. Holy moly, these babies are simple to make and dangerously good. They were polished off by the end of the night and honestly, you can eat them by the handful. They are addicting little mouth-watering treats. They make your house smell phenomenal, and they add just the right amount of class to a childhood favorite. 
        So whether you are having a party or just lounging around in your PJs hiding from gnarly weather outside, these crackers can be made and out of the oven before you know it...and they will probably be gone before you know it too! 

Adapted from "The Smitten Kitchen Cookbook" by Deb Perelman
Oven Temp: 350 F
Equipment: Food Processor
                     Cookie Sheet
Ingredients
1 1/2 C. (170 g/6 oz.) White Cheddar Cheese
1/2 stick (55 g) unsalted butter
3/4 C. (95 g) All-purpose flour
1/2 TSP Herbs/Spices: divide evenly between garlic powder, paprika, and oregano
1/4 TSP Salt
Instructions:

1. Places medium chunks of cheddar in food processor and pulse until grated.


2. Add flour, butter, herbs/spices, and salt. Turn on and let it go until a course meal forms. 
3. Flip dough onto a piece of plastic wrap and form it into a loose ball.
4. Pat down to a square and wrap up. Refrigerate for at least 20 minutes.
5. Meanwhile, preheat oven and grease cookie sheets.
6. Remove dough, and roll it out to 1/8 inch thick on a lightly floured surface.
7. Cut it into small squares using a sharp knife or bench scraper (you could also use cookie cutters for fun shapes if you want to bring a smile to your face) and use a fork to poke holes in each cracker.

8. Bake for 10-13 minutes until edges are golden brown, and crackers develop some crispness.
9. Remove, let cool for a moment, and dig in...or store in an air tight container for up to 3 days (that will not happen.) 

Tuesday, September 10, 2013

Bananas Foster Cake

         There is something very exciting to me about a multi-layer cake. I know it sounds silly, but something with layers, a great frosting, crafted by hand...it just does not get much better than that in dessert world. Everyone can relate. Children and adults all like cake. They are sweet and decadent, moist and fun, interesting to eat (I mean everyone has their own way about going about digging in to their own slice), and can be truly beautiful to behold. Yes, a good slice of cake is hard to beat.
          As I was deciding what to make for my next post, I walked into my kitchen to fill my water glass, and the cabinet above the sink hit me hard in the nostrils with the strong scent of bananas screaming "USE MEEEE!" When I opened the cabinet, sure enough, there were three perfectly overripe bananas, ready to be mashed up and put into my sweets. The decision was made; Sunday afternoon baking had to include bananas. 
         The obvious road here would have been banana bread, but gosh-darn it, I wanted dessert, not another tea cake. So it was time to forgo the spiced loaf with chocolate chips and make a true cake to behold. My trust in the "Fannie Farmer Baking Book" by Marion Cunningham is garnering increasingly large portions of my love. I knew that this book was where I should start my brainstorming and it was absolutely the right decision.
            The banana cake was so light and fluffy, not at all like the traditional dense loaf I wanted to avoid. Achieved through folded in whipped egg whites, it was more like a classic yellow cake with the gentle sweetness and moisture of bananas. The toasted walnuts throughout added not only a great texture, but also a wonderful depth of rich, nutty flavor.
         Then I had to decide what was the proper topping for such a cake. I do not make big cakes at home to often because of the size of a double layer 9-inch cake in ratio to the people in my household is a bit off. So when I do make a layer cake, I insist on making it as decadent and fulfilling of my dreams as possible.
          I have to admit, I have a very strong affection for caramel. It is one of the beauties of life to me. Equal parts inverted sugar and deliciously sinful heavy whipping cream, hit with some salt and vanilla...I dream of it. It is brilliant. I will eat it by the spoonful. I will put it over and in whatever I can. I think caramel sauce, no matter how simple in concept, is a stupendous culinary feat.
        My favorite frosting is cream cheese. It goes so well with so many flavors, and similarly to the sweet-salty combo we are all so fascinated with, it fulfills another palate desire-sweet and tangy. So I thought "What if I combined the sweet cake, salt in the caramel, and tang in the cream cheese on my lazy Sunday afternoon?" And so was born, the Bananas Foster Cake.
            Oh my goodness. I am so happy eating this cake. I have nothing else to say about it. Forget banana bread for breakfast, buy your bananas, let them brown and make this cake. Let the flavors meld in your mouth to form a balance of sweet bananas, rich, salty caramel, deep walnuts, and tangy cream cheese. Let the thick, gooey topping ooze down with your teeth between the moist crumb of the cake as you bite in to it. Do not resist. Do not think twice. I do not care if you live by yourself which is making you think you do not want to make a full cake. Invite people over. You need to eat it, because sometimes we all just need a two-layered delicious hunk of cake on our plate.

Inspired by "Fannie Farmer Baking Book" by Marion Cunningham
Oven Temp: Sea Level-350 F
                      Altitude-375 F*
Equipment: 2 X 9 inch rounds
                     Multiple Mixing Bowls 
                     A hand or stand mixer
Ingredients:  
Cake:
1/2 C (1 Stick) Unsalted Butter, room temperature
1 1/2 C Granulated Sugar
3 eggs, separated
1/2 C Buttermilk (or 1/2 C Whole Milk minus one TSP and add 1 TSP Lemon Juice)
2-3 smashed bananas (about 1 C)
1 TBPS Vanilla Extract
2 C All-purpose flour
3/4 TSP Baking Soda* (1 TSP at Sea Level)
3/4 TSP Baking Powder* (1 TSP at Sea Level)
1 TSP Salt
1 C toasted, chopped walnuts (optional, but strongly encouraged)
Icing:
4 TBSP (1/2 Stick) Unsalted Butter, room temperature
8 oz. Cream Cheese, room temperature 
1 3/4 C Powdered Sugar (sift if there are clumps present)
1 TSP Vanilla Extract
Salted Caramel Sauce:
1 C sugar
1 C Heavy Whipping Cream
1 TSP Fine-grain Salt
1 TSP Vanilla Extract
A small amount of water
Instructions
Cake:
1. Preheat oven. Grease and flour, or grease and line cake pans with parchment paper.
2. In a medium bowl, sift together flour, baking soda, baking powder, and salt.
3. Cream the butter until for about 30 seconds then add the sugar and cream the two together. Since it is a 3:1 sugar-butter ratio, it will not look as normally creamed as other things. You are more looking for a smooth consistency and light color. 
4. Beat in egg yolks.
5. Mix buttermilk/milk-lemon mixture. It will likely look broken or curdled now. 
6. Mix in mashed bananas and vanilla extract.
7. On low speed, mix in flour mixture in 3 additions, until well incorporated and thick batter is formed. Scraping down the side, finish by hand with a spatula to make sure no dry flour spots are left.
8. In a small mixing bowl, beat egg whites to a firm, but moist peak.
9. Put a small dollop of the whites on top of the batter and begin to fold them in. To fold, use gentle, large strokes, moving your spatula around the sides of the bowl and folding the batter up and over. Once the first dollop is incorporated, add the rest of the mixture and repeat the same motion until it is all folded in. You want to take the time to fold gently, or you will collapse the whites and the cake will be dense.
9. Fold in the walnuts.
10. Pour the batter into the two prepared pans. If baking at 375 it only takes about 20 minutes, at 350, expect closer to 25-30. Check with an inserted toothpick coming out clean (be careful not to mistake banana mush for cake-this could lead to over baking) and look for the cake edges pulling away from the sides.
11. Remove, allow to cool for 10 minutes, then remove from pans and let rounds rest on cooling rack.
Icing:
1. Meanwhile, add butter, cream cheese, powdered sugar and vanilla extract in a mixing bowl beat until a smooth consistency is achieved. 
2. Place a piece of plastic wrap over top and place in fridge until ready to use.
Caramel Sauce
1. Get heavy bottom or non-stick sauce pan and make sure there is nothing on the sides. It is very important in sugar cookery to start with a clean pot or your sugar will crystalize. 
2. Carefully add sugar to the middle of the pan, avoiding getting any crystals on the sides.
3. Gently add a small amount of water; just enough to make the sugar appear like wet sand.
4. Turn on heat and bring to a simmer, DO NOT STIR, but watch carefully for the development of color. Do not go fold laundry now folks.
5. Once a rich caramel color is achieved, move the pan off the heat momentarily and add the heavy cream. The mixture will seize up. Let it settle for a moment, then return to heat stirring until combined. 
6. Stir in vanilla extract and salt until dissolved.
7. Remove from heat and pat yourself on back. You made caramel.
Assembly
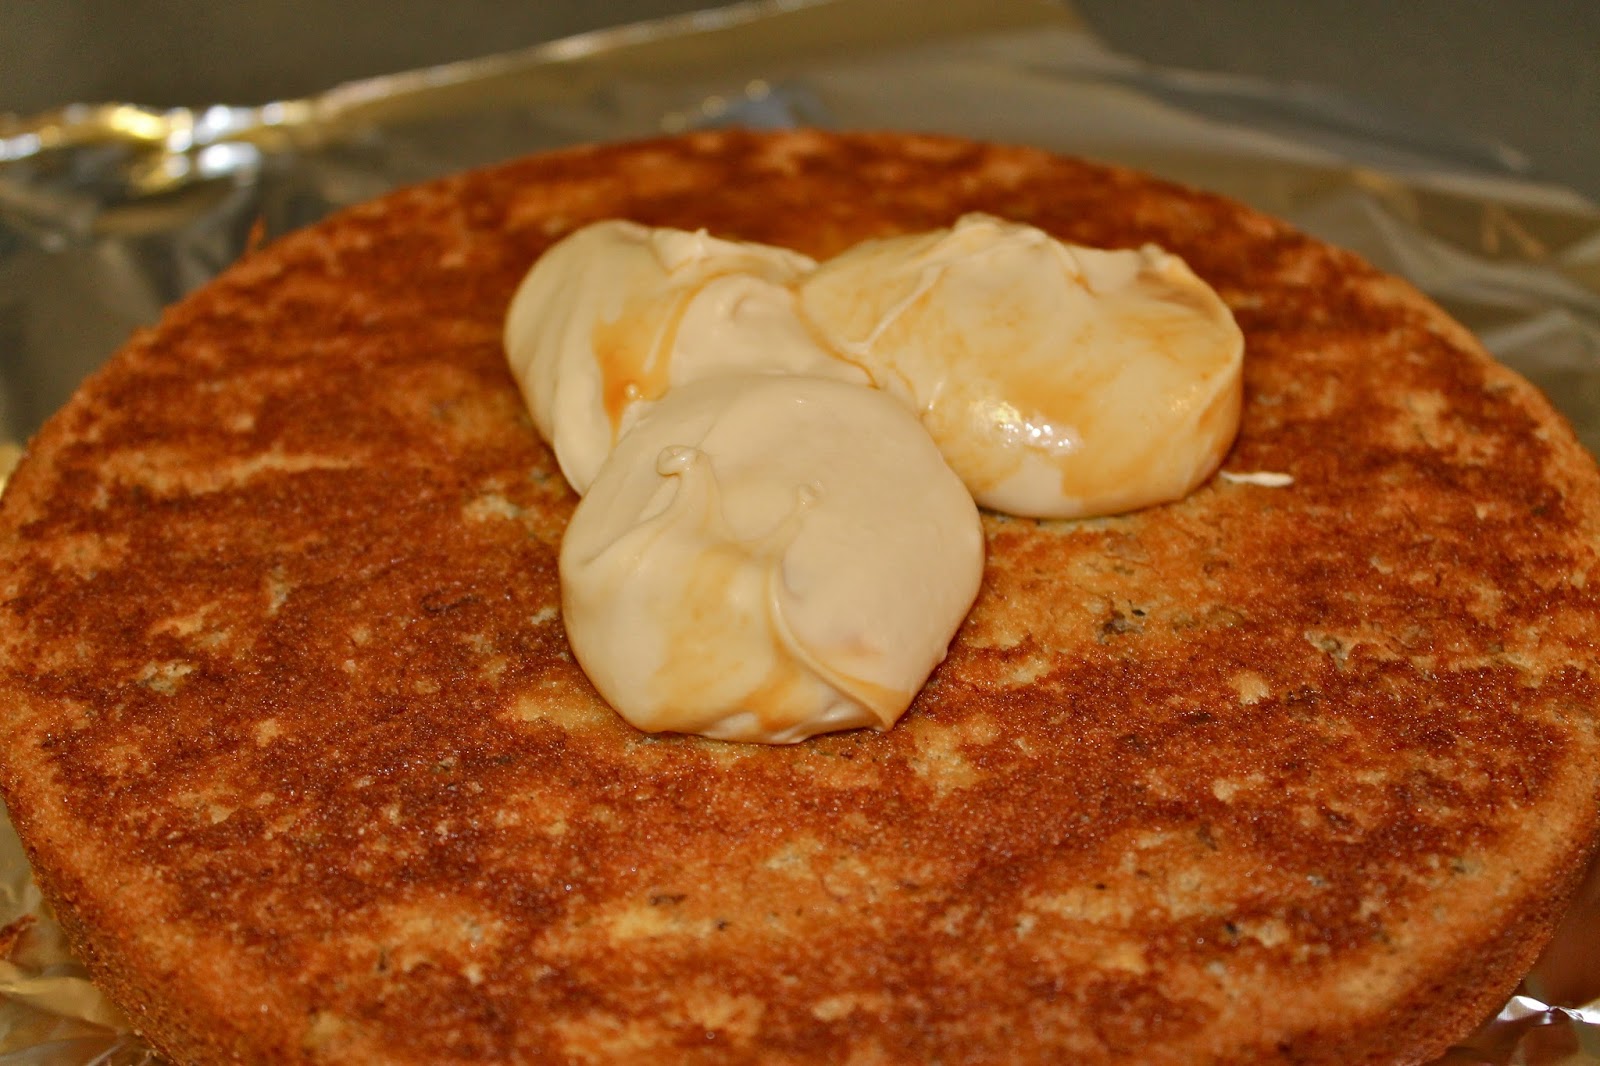
1. Beat in 2-3 TBSP of caramel to the cream cheese frosting.
2. Place down your first cake round, scoop on a generous amount of frosting and spread in an even layer over top.
3. Repeat with the second layer.
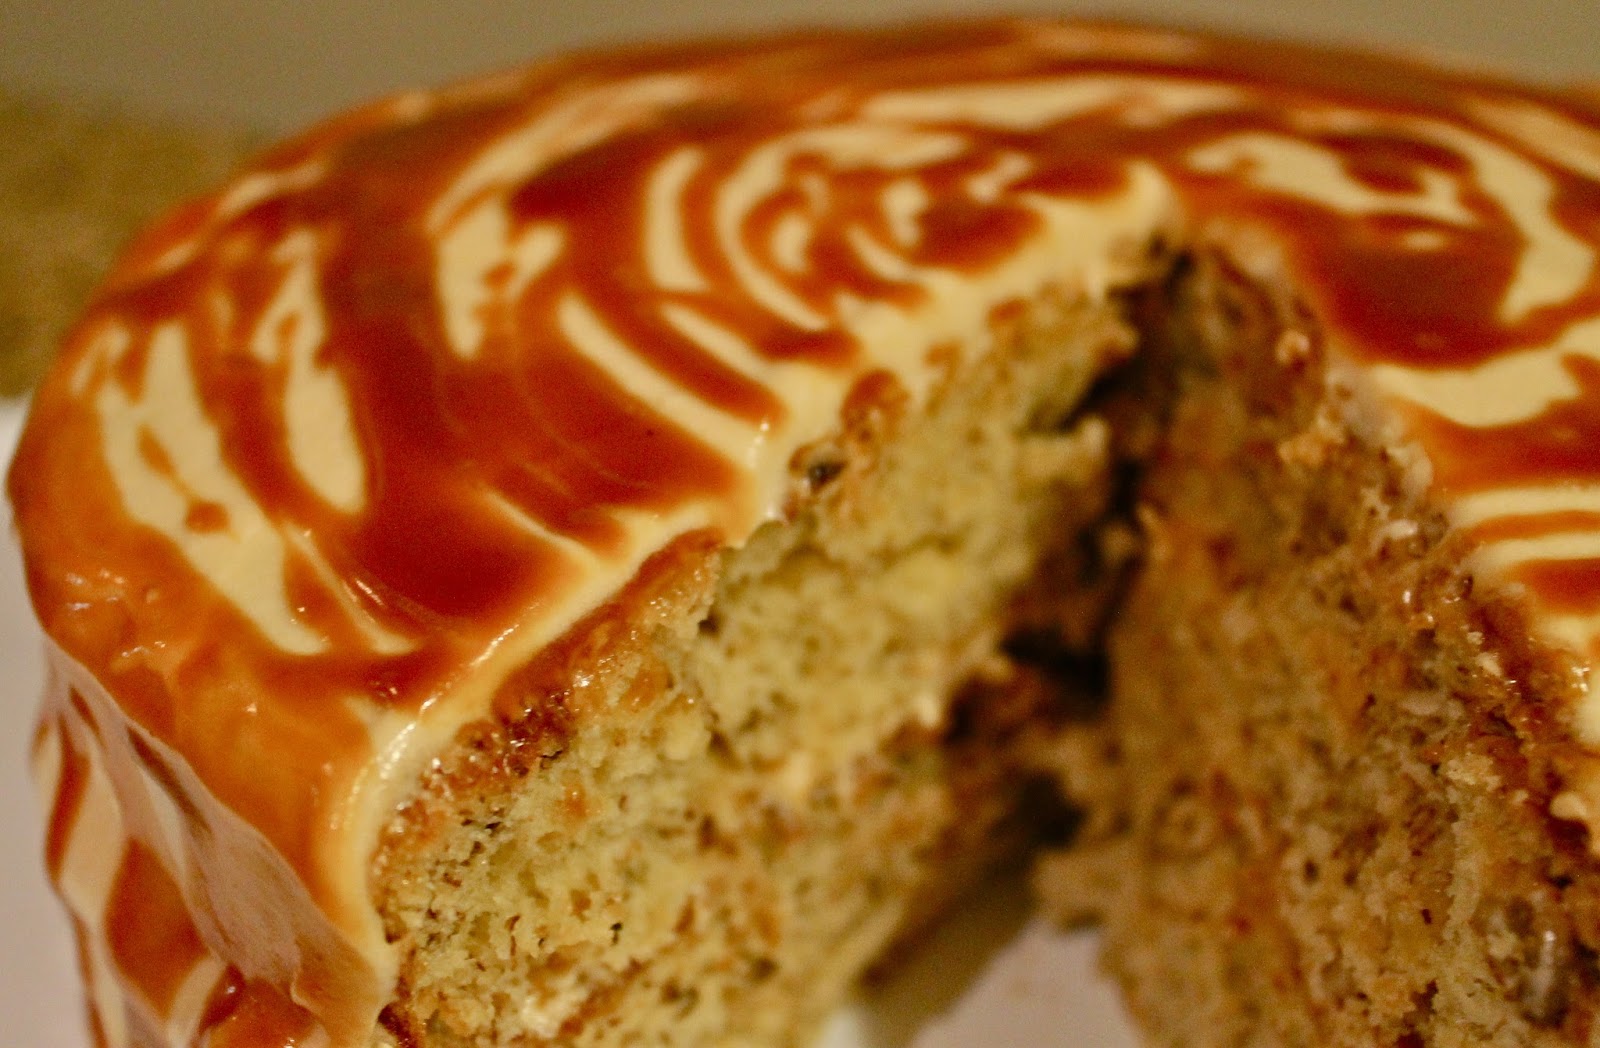
4. By placing extra icing along the edges of the cake, use an offset spatula to push it over the edge and begin to ice the sides of the cake.
5. Using a spoon, drizzle the cake with caramel sauce, allowing it to get a good amount on top and drip over the sides into a beautiful mess of deliciousness.
GOOD-GOD YOU'VE DONE A GREAT JOB RESISTING! DIG INTO THAT FREAKING CAKE NOW!