Wednesday, October 30, 2013

Coconut + Pecan + Chocolate Upside-Down Cake

      Upside down cakes are wonderfully simple to make, impressive in appearance, and nearly endless in possibilities of tops. However, you normally only see fruit upsides-downs. I would put money on the fact that most of your firsts were bright sights of yellow pineapple rings with maraschino cherries in the middles. I had only ever had a fruit one before this beautiful invention.
So much goodness.
        When I first doggie eared the recipe in my beloved Fannie Farmer Baking Book, I patiently awaited the right time to make it. I knew, I would not be able to stop from eating this delicious oozing top of all my favorite things, surrounded by a moist yellow cake if I made it just as my lazy Sunday afternoon cake. How could you possibly look as  all the goodness dropped tantalizingly down the edges and not go back for more...and more? The cake is not beautiful in a decorative sense, but it is beautiful in the fact that when you look at it all you want to do is take a fork to its edges and start working your way in.
I could take a spoon to the raw batter and topping and even be a happy...so...tempting...ahhh.
         It is my roommate's, mom's birthday this week and Jess asked me over a month ago if we could plan a special cake since Sue is normally the cake maker for the rest of the family. So last Sunday, we sat down with my heap of most trusted cookbooks on a search for the best decadent birthday treat. We narrowed from about six cakes, to settle on this. Both giddy over the book's description, it was finally time to make the Coconut, Pecan, Chocolate Upside-Down Cake I had been patiently (ok, honestly impatiently) awaiting. I am not kidding guys; fruit upside cakes are great, but for now eat those apples and pineapple just plain. It's time to indulge in caramelized coconut, pecans and chocolate melted to perfection and met with the perfect pairing of sweet yellow cake. 
         Happy Birthday, Sue! May it be delicious and happy, and may the year ahead be full of joyous times. 
Adapted Slightly from "The Fannie Farmer Baking Book" by Marion Cunningham 
Oven Temp: 350 F
One 9 in" cake round 
Ingredients: 
8 TBSP unsalted butter (1 stick, divided in half)
1/2 C brown sugar
1/2 C shredded coconut
2/3 C pecans
2/3 C semi sweet chocolate chips
1/3 C + 2 TBSP milk (divided)
1 C all-purpose flour
1/2 C granulated sugar
1 1/4 TSP baking powder (1 1/2 at sea level)
1/4 TSP salt
1/2 TSP vanilla extract
1 egg
Instructions
1. Preheat the oven to 350 and grease the cake pan.
2. Combine the brown sugar, coconut, pecans, and chocolate chips in a small bowl.
3. Melt 4 TBSP of butter in a saucepan. 
4. When it is completely melted, remove from heat, add the 2 TBSP milk and follow immediately with the brown sugar and toppings mixture. Stir until blended together.
5. Pour the mixture into the prepared cake pan and spread evenly.
6. In a medium bowl, whisk together the flour, sugar, baking powder and salt. 


7. In another bowl, whisk together 4 TBSP melted and cooled butter, egg, vanilla extract, and 1/3 C milk.
8. Add the wet ingredients to the dry and stir until thoroughly combined.  
9. Pour the batter over the coconut, pecan and chocolate mixture and spread evenly. It is a sticky batter so you may have to gently work it and grease the back of the rubber spatula to manipulate it.
10. Bake for 30 minutes until a toothpick going only into the cake portion comes out clean and the top has just started to brown in spots.
11. Let the cake rest for 5 minute, then quickly invert it. If any of the topping sticks to the pan, you can easily scoop it out at this point and spread it on top of the cake. It will harden together. 


Tuesday, October 22, 2013

Buttered Bourbon Apple Pie


 A Tale of Fall: 
      Last week, my boyfriend and I were sitting on swings at Sloan's Lake, a favorite spot of mine in the Denver area, when he explained what he thought of fall colors. He said it was like the final ball before winter. The trees know the end of their season is coming, so they all adorn their most beautiful attire and nature is in one big celebration. I like that a lot. I am through and through an autumn person when it comes down to it and I particularly love October.
     The excitement of the holidays is on the horizon, but its still low key. I love fall festivals, pumpkins on people's porches, and little kids planning their costumes. I love the first warm soup of the season, getting to wear the new sweater my sister knitted me for graduation, and most particularly, I love the way the world looks.
       So the other day, I decided it was time for a fall photo tour of my neighborhood. I really enjoy getting to walk around and observe nature. Taking it in on a conscious level is a practice in my daily life that brings me peace. However, some days I find trying to see and focus on it in unusual ways is equally important. I like to focus on the individual aspects and colors while working to absorb the uniqueness of nature. In fall, the practice of appreciation of the outdoors becomes extra special for me. So right now, these are some sights I am grateful for.
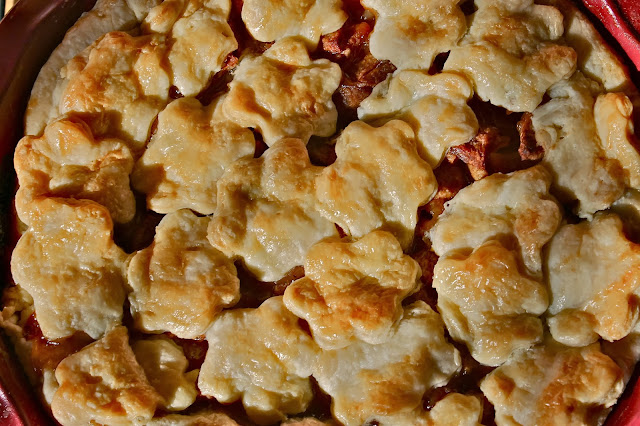
      I am also grateful for some things back indoors right now too though. One of which is the increased amount of pie I get to justify making (and by making, really I mean eating). Let's all be honest, a buttery, flakey crust surrounding anything makes it taste better. However, it tastes especially better when it surrounds tart, buttery, bourbon cooked apples. This pie guys is a perfect compliment of buttery crust, buttery insides and tart delicious apples. The crust is flakey and golden, not to hard to work with and beautiful. You can see the layers when you look at the pie pieces on top as you pull it out of the oven. Believe me, your eyes and nose will quickly remind you that you just got really hungry. The butter flavor is warm and smile inducing. The filling is tart and oh so perfectly apple happy. The light flavor of bourbon comes through to add a gentle dark caramelized, woody flavor to the apples. The spices enhance the flavors, but are gentle enough again that they really only make the apples shine that much more rather than steal the show. This ladies and gentlemen, is a true buttery apple pie, ready to highlight the season's most beloved fruit. It is time to celebrate with the trees in the final ball by using the bounty they give us in the most delicious way. 
Apple Filling: 
1 double pie crust*
    I made a double batch King Arthur's Favorite Pie Crust
    HIGHLY Recommended-so flakey and easy to work with. 
8 small granny smith apples, pealed, cut and thinly sliced (6 large)
4 TBSP all-purpose flour, divided
1/2 TSP nutmeg
1 TSP cinnamon
4 TBSP unsalted butter
1/3 C sugar
2 TBSP heavy cream+1 TBSP (for brushing the crust)
3-4 TBSP bourbon 
1 TSP vanilla extract
1/4 TSP salt

Instructions:
1. In a medium bowl, combined prepared apples, 2 TBSP flour, nutmeg and cinnamon. Stir until all the flour is dissolved. 
--My apples were from a friend who had already prepared them for apple pie and frozen them. Therefore when I defrosted them, they already had a significant amount of moisture to work the flour in. If needed, add one less TBSP of bourbon directly into the pan and add it to the apples first.
2. In a saucepan, melt butter, and then add the sugar. Stir around and let cook for 2-3 minutes until sugar. Then add the heavy cream, bourbon, vanilla, and salt. Stir together and let the mixture continue to cook.
3. Once the mixture has translucent bubbles, and has thickened, pour the liquid over apples in the mixing bowl and stir to coat. 
4. Next pour the apple and mixture all back into the pan and add 2 TBSP of flour. Mix together to thicken, and then bring the mixture to a gentle simmer to allow the liquid to reduce. 
5. Once very little liquid is left, the mixture is thickened, pour it all back into the large mixing bowl and allow it to cool completely.
6. When the apple mixture is cooled and your pie crust is made and rested, you are ready to bake. Preheat the oven to 400F and place the rack on a middle shelf.
7. Roll out the base dough of the crust and invert it into a greased pie dish. Place the filled pan in the fridge and get out the second half of dough. 
8. Roll out the second half in the same fashion, then using a cookie cutter, cut out as many shapes as you can from the dough.
9. Working quickly, remove the base from the fridge and fill it with the cooled apple mixture.  
10. Lay the dough cut outs around the edge of the pie and work in circles moving inward until the top is covered. It is good to have small gaps as these allow the steam to vent through the crust. 
11. Brush the crush with a light coating of heavy cream. 
12.  Place the pie into the oven and cook at 400F for 20 minutes. When that is done, do not open the oven, simply lower the temperature to 375 F and continue baking for 55-65 minutes, until the top has lightly browned and the insides are bubbling up between the cracks. 
13. Remove from the oven, allowing the pie to cool for 3 hours. This will give the filling time to finish setting and ensure the inside does not run when you cut into the pie. 
14. Reheat if desired, top with whipped cream or ice cream, and dig in to the flaky, apple filled, butter-laden goodness you have created!


Monday, October 21, 2013

Chocolate Orange-Raspberry Scones

       During college, I never felt comfortable saying, "I am a baker." I would explain I was an English major, and I really liked to bake. As for my plans after college, they were a loose "ehh, find my way" kind of thing. However, the generic response was not because I did not know what I wanted to do, but rather because I was scared of saying "I want to bake."
      Now, when an English major gets asked what they plan to do when they graduate, most people expect them to respond: "I am going to teach." However, I had that area covered. I knew I was not going to be a teacher and I was ready and armed with the feeling of being comfortable that I simply studied what I enjoy.
      Instead, the fear of saying I wanted to bake stemmed from wanting to avoid the phrase "I am a baker." I was afraid after college the dream of being a baker would not come to fruition, and I did not want people to know that I did not achieve what I had set in my mind as the ideal life. 
        After a whirlwind of change in my life, I finally worked up some damn hutzpah and I told some people. It started with one of my best friends, then my boyfriend, my parents and onward: the phrase "I want to bake" was finally permissible in my mind.
        However, it still took until about 4 months ago, after I had graduated and I could no longer hide under the comfort of saying, "I am student" that I started saying, "I am a baker." The moment it rolled off my tongue I was filled with an almost ecstasy of excitement because good-golly y'all, I freaking love what I do and you better bet your bean-eatin' tootin' self I am one.
        I had three moments of confirmation of this in the past week, and I am sure that more are still on the way. The first was I when was getting dressed one morning and I pulled on a sweater I had not worn in about 2 weeks. As it turned upside down, a teaspoon fell out of the pocket onto my bedroom floor. I have enough measuring sets I had not noticed it missing. Baker's moment #1. A few days later I was hanging some artwork in my room with a nail. I did not have a hammer, so I went for my heaviest, thickest book, The Culinary Institute of America's textbook. Baker's moment #2. Today as I went to grab the snowbrush out of the back seat of my car in preparation for the morning, the brush knocked an old cookie cutter out from under my passenger seat. Baker's moment #3. So world: I am Maisie, I am Boulder Butter, and I am sure as hell a baker. Today I made scones: bitter chocolate, sweet raspberry, bright orange, flaky, crumbly, yet moist breakfast awesomeness-scones. 
Inspired by the America's Test Kitchen's "Baking Illustrated" Cream Scones with Currents

Oven Temp: 375 F

Ingredients
9 ounces all-purpose flour*
1 ounce cocoa powder*
1 TBSP baking powder
3 TBSP sugar
1/2 TSP salt
5 TBSP cold, unsalted butter, cut into 1/4 inch cubes
1/4 C macerated raspberries (recipe and ingredients below)
1/4 C chocolate chips
1 C + 1 to 2 TBSP heavy cream

*If you do not have a scale, this should be 2 C of fluffed/sifted flour total. So if you wanted to convert it, do 1 3/4 C +1 TBSP all-purpose flour and 3 TBSP cocoa powder. 

Macerated Raspberries:
Place 1 C raspberries, 1 TBSP sugar, the zest of half an orange, the zest of half a lemon, 1/8 TSP vanilla extract, and 1/8 TSP orange liquor in a bowl and let them sit for 30 minutes. You can use left overs for oatmeal, on top of ice cream, ect. 

Instructions:
1. Preheat the oven and combine the flour, cocoa powder, baking powder, sugar and salt in the bowl of a food processor. Pulse the dry ingredients together until they are combined. 
2. Add the butter and pulse again in about 12-one second pulses until the butter is mixed into the flour, but still has larger pea sized pieces.
3. Add in the raspberries and chocolate chips and pulse two more times. Transfer the flour mixture into a large mixing bowl.
4. Slowly add the heavy cream, mixing with a rubber spatula until the mixture comes together.
5. Dust the counter with cocoa powder and turn the dough out onto it. Finish gathering it together, knead it slightly into a ball, and then gently pat it out into a square. 
6. Roll the dough until it is about 1/4 inch thick and cut with a sharp ring mold, pastry cutter, or knife.
7. Transfer the scones onto a prepared baking sheet and sprinkle with course sugar.
8. Bake for 12-15 minutes until the scones are set and the tops have just slightly darkened.
9. Remove from the oven, let cool slightly on a metal rack and enjoy warm or at room temperature. 
They were absolutely delicious, and then they were gone.