Monday, April 28, 2014

Strawberry Crumb-Packed Pie

   There are a few foods I have been diligently craving lately...kale, avocados, mounds of salsa, carrots (an odd one, I know), peanut butter, and strawberries. Like lots and lots of strawberries. By themselves, on my salads, in biscuits, mixed in yogurt, with lemon curd...pretty much anywhere really. 
    I needed a solution to my addiction. So obviously, I made a strawberry PACKED pie, no room in rhubarb for this one (my apologies rhubarb, you can play later). I wanted a think, gooey, warm filling of small-diced strawberries, and big thick chunks mixed together. 
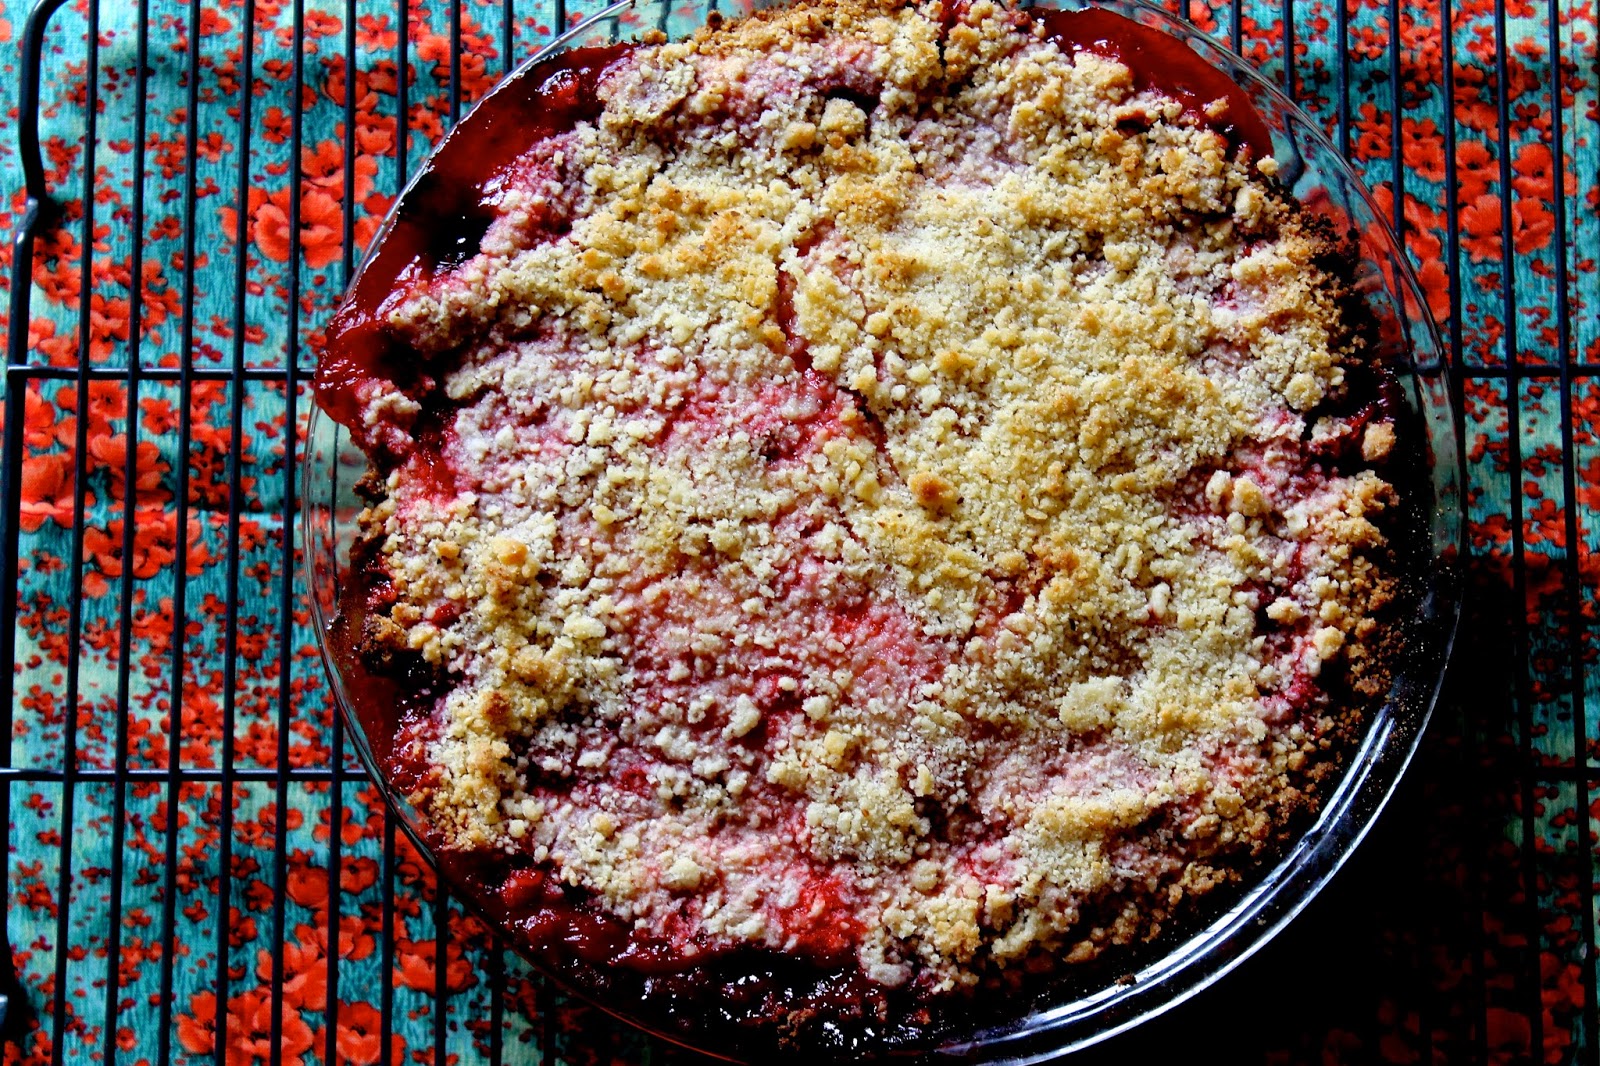
      Once that was settled, I knew the next step was deciding just what kind of pie I wanted this to be. Since I was indulging my food visions, I figured why would I dare stray away from my ultimate dessert love-struesel. This pie not only is COVERED with a generous topping of crumbles that can only mean love at first pie sighting, but also, the crust is formed by pressing these crumbs into the pie dish so they are also the base.
     I know most of the time if someone told you the important qualities of pie were the struesel and lots of fruit, you would respond-"Don't be silly, just make a cobbler and forget the crust." But I am stubborn and wanted my fruit surrounded everywhere with happiness. So today, I introduce you to The Strawberry Crumb Packed Pie.

Filling
1 3/4 lb. hulled strawberries
1/2 C granulated sugar
2 TBSP cornstarch
Juice and zest of 1 lemon

Crumb Base and Topping
1 C all-purpose flour
1/2 C granulated sugar
1/2 TSP ginger
1/4 TSP salt
1/2 C almond meal (or roughly chopped almonds)
8 TBSP (1 stick) butter, unsalted, room temperature

1. Preheat the oven to 425F (at high altitude) or 400 (at sea level) and place a rack in the lower third of the oven.
2. In the bowl of a food processor, pulse 1 lb. of the strawberries until finely chopped. Using a knife, rough chop the other 3/4 lb. into large chucks.
3. In a medium bowl, mix together all of the strawberries, filling sugar, cornstarch and lemon juice and zest. Set them aside to rest.
4. Clean out the food processor and prepare the crumbs by combining the flour, sugar, ginger, salt and almond meal. Pulse the processor a few times to mix everything together. Cut the butter into chucks and add them to the flour mixture. Pulse the mixture a few times until you have crumbs around the size of large peas. 
5. Scoop half of the crumb mixture into a 9" pie plate and press it into the bottom and edges. (It is sticky, so a wadded paper fowl may help press it down without getting it all over your hands.) Add the strawberries and spread them evenly over the bottom. Sprinkle the remaining crumbs evenly over the pie. 
6. Bake for 35-40 minutes until the filling is oozing out and the top has golden brown bits. Allow the pie to cool for 2-3 hours before cutting. Serve with whipped cream or vanilla ice cream.

*You can do this recipe by hand, but a food processor makes it faster. If you don't have one, just cut the strawberries by hand. Then mix together the dry ingredients in a small bowl and cut the butter into the mixture until you have crumbs.

Love, 
    Boulder Butter

Saturday, April 19, 2014

Imperfection & Not a Cake

      This week I had lofty goals of taking on the ultimate chocolate cake-buttermilk, sour cream, cocoa powder, both bitter and semi sweet chocolate were all invited. The truth is, the cake itself was phenomenal, and although the frosting was good, it was not "the ultimate chocolate frosting." 
     However, that is not really the full reason I don't have a post for you today. It just so happens, I was short on time, and against all better judgment screaming in my head, I decided to rush through and assemble this cake while it still held a smidgen of heat. The cake however was not in the same rush. Nor was the frosting since I didn't give it enough time to chill out before proceeding.
       This moral of the story is, I created a cake that broke, caved in, and got droopy, melty frosting all over the place. It was totally not at all blog worthy; at least that is what I first thought. In some ways I was right, I am not going to share the recipe with you. However, I am sharing my baking disaster, because I think its important to remember it is better to still always enter the kitchen. 
       I take this blog seriously and I put deadlines on myself. I wanted to get this post a post out to you! I wanted it to beautiful and spectacular for Easter. Really, I could have let all the components cool, gone to work, and dealt with the whole thing the next morning, still able to post on time.
      That all being said, it also reminded me that part of baking is imperfection and the aesthetics are far from being the part I value the most! Working for a bakery and blogging has made me more aware of these things and their importance in those settings, but in the past, I almost purely concentrated on taste and texture. For anyone baking at home, I think that is an totally OK thing to do!
        So why did I let this cake get to me so much now? Because sometimes, imperfection is scary. People don't want to cook or bake out of fear that they might mess up. However, it totally doesn't matter! Part of baking is that you will mess up sometimes! You will forget an ingredient or try to cream your butter to early, or your cake won't come out looking like the one in the cookbook. It is OK! 
       It has been 24 hours since I made my "disaster" cake, and my roommate and I have eaten nearly half of it already! It is still delicious- so please never be afraid to enter the kitchen. Imperfection, mishaps, and total calamities (see peanut butter cookies) are part of it.  As my mom said after I texted her in a pouty mess, "You will rise like a Phoenix from the wreckage of the warm frosting." I promise you will. Back to the kitchen today for some Easter treats! More to come soon.
  Love,
        Boulder Butter

Sunday, April 13, 2014

Whole Wheat Jam Sweet Rolls

      Sometimes, all you need in life is a warm piece of bread, some butter spread generously on top, and a good slathering of jam. I mean, who argues with the smell of coffee and toast in the morning? If you start your day off with these in your kitchen, I positive it is going to be better.
          And sometimes, you want freshly baked bread to start your day. I for one, am never going to fault you for that. I have a particular weakness in my heart for brioche, which is a French style bread, that is lightly sweetened, heavily enriched with butter, and absolutely heavenly. If pastries were to meet bread, start dating, get married, and birth a brilliant baby, I am pretty sure it would be brioche. 
        This dough is very similar to a traditional brioche that is made in into a braid around Easter. It requires minimal kneading, are is pretty much just thrown in the bowl, stirred, rested, and given a little love; before long you will have a much more decadent tasting toast, butter and jam on your table. Because sometimes, that is the only type of bread that will suffice in the morning. Unlike normal toast, each individual roll has a gooey, soft center; and there is a center roll to the roll pan, and the center of the center roll, is pretty much the most coveted thing in the world. (At least in my world, and if that is the same in your world, there is a good chance we could be friends.)  
        Finally, the thing that makes this so wonderfully easy, is that all that you have to do is brush them with melted butter and dollops of your favorite jam or fruit butter-mine was a delectable apple butter from a local creole restaurant I adore. This simple mixture is not only fuss-free, but also not overly sweet. I love, I mean, love pecan sticky buns and cinnamon rolls, but sometime they are too much in the morning. These gentle treats are simple, soft bread with the your favorite pantry staples, pulled warm out of the oven-perfectly simple.

Lightly inspired by "Briochettes au ducle de leche" in The Little Paris Kitchen by Rachel Khoo

Make 6-7 medium sized rolls
Ingredients:
5 TBSP unsalted butter
3 1/2 TBSP water
1 TSP dry active yeast
1 1/4 C all-purpose flour
3/4 C whole wheat flour
1/4 C sugar
1 pinch of salt
1 egg, beaten
1 heaping TBSP sour cream
1 TSP vanilla extract

3 TBSP unsalted butter, melted
1/2 C apple butter (or sub whatever jam or preserve you prefer on your toast!)

Instructions:
1. Melt 5 TBSP butter, add it to lukewarm water, and stir in the yeast until it dissolves. 
2. In a large bowl, mix together the flour, sugar and salt. Push the dry ingredients to the sides to create a well in the center. Add the yeast mixture, the egg, vanilla, and sour cream, and combine until you have a soft, sticky dough with no flour streak remaining.
3. Cover the bowl with plastic wrap and allow it to sit for 2 hours in a warm place or overnight in your fridge until it has doubled in size.
4. When ready, preheat oven to 350F. Butter and line a 8 or 9" cake round pan with parchment paper. 
5.Turn out the dough onto a lightly floured surface, and knead the dough for 4 minutes. Next, roll it into a large rectangle and brush 3 TBSP melted butter over the entire surface. Dollop the apple butter around the surface of the dough and brush it around to cover the entire surface.
6. With the long side facing you, roll the dough up into a log. Slice the rolls into even rounds (about 6 or 7). Place the rolls in the prepared pan with space in between them. Gently cover the pan with plastic wrap and allow it to rise in a warm place until they have doubled in size (about 45 minutes sitting on the preheating oven).
7.  Bake for 25-30 minutes until the tops have become golden. Remove from the oven and allow the rolls to cool on a wire rack for 10 minutes before serving! Happy Breakfast.

Love,
 Boulder Butter

Tuesday, April 8, 2014

Almond + Cinnamon Sour Cream Squares


         This is something you make for a person you love. If you are nice enough to give it to someone, you know you love them because: 1) You are willing to part with it and lord knows you will not be willing to do that for anything less and 2) it calls for two and a half sticks of butter, and butter is a very precious commodity. Then you add sour cream in the mixture, and you know you really want to impress them!
          The bottom cake is soft and slightly crumbly and kind of cakey, but really moist. The middle is gooey; like melt in your mouth goodness that simultaneously melds into the vanilla bottom. The top is sprinkled with cinnamon and sugar right before it bakes, and becomes a caramelized bite, and where it hits the edges becomes just slightly chewy.
          If I were not making this for someone I love, then I would be very tempted to stop writing this and go cut off all the edges of this cake and slowly savor my way around them. If you are like me, you may also struggle with that when you lift it out of the pan and have the cinnamon and almond scents filling your nose.
         You may also struggle not to just take a spoon right too it and burn your mouth when you pull in out of the oven. I did not do either of these things, but it was only by the greatest practices of self-restraint. I wish you luck.
P.S. The person I gave them too described them as "the perfect meeting of coffee cake and cinnamon roll." I really like that :)
Adapted from Smitten Kitchen's "Gooey Cinnamon Squares" in The Smitten Kitchen Cookbook
Cookie/Cake Base:
8 TBSP unsalted butter, room temperature
1 1/2 C all-purpose flour
1 TSP cream of tartar
1/2 TSP baking soda
1/4 TSP table salt
3/4 C sugar
1 large egg, room temperature
1/4 C (generous) full-fat sour cream
Gooey Layer
1/4 light corn syrup (honey is fine too)
1/4 C (generous) sour cream
1 1/2 TSP almond extract
1 1/2 TSP vanilla extract
12 TBSP butter, room temperature
1 C sugar
1/4 TSP salt 
1 large egg, room temp.
1 1/4 C all-purpose flour
3/4 TSP cinnamon
Topping:
2 TBSP sugar
3/4 TSP cinnamon

1. Preheat your oven to 350 F and butter and line a 9x13 pan with parchment paper. Allow 2 inches of excess parchment paper to go up the sides so you will be able to lift the bars out.
The Base
2. In the bowl of a stand mixer beat together the butter and sugar until light and fluffy. Add the egg and beat until incorporated.
3. In a medium bowl, whisk together the flour, cream of tartar, baking soda, and salt. Add them to the wet mixture in 2 additions and mix until combined.
4. Pour the base into the prepared pan; spread it evenly over the pan using an offset spatula- the dough will be sticky. Set the pan aside.
The Goo
5. Whisk together the corn syrup, sour cream and extracts in a small bowl.
6. Wipe down the bowl of the stand mixer, and beat together the butter and sugar. Add the salt and egg and beat until combined. 
7. In a small bowl, whisk together the cinnamon and flour.
8. In alternating additions, starting and ending with the flour, add the sour cream and flour mixtures (flour, sour cream, flour, sour cream, flour). Mix until incorporated and scrape down the sides between the additions.
9. Dollop the cinnamon mixture over the cookie base and spread evenly.
The Top 
10. Stir together the cinnamon and sugar in a small cup and sprinkle it over the top. It will look like a lot but it will cook and while baking-don't worry about it.
11. Bake for 25-30 minutes until the cookies have bronzed. Remove and all the cookies to full cool on a rack before removing. These will keep at room temperature for at least a week. 

Love, 
   Boulder Butter

Friday, April 4, 2014

Yeasted Chocolate Bread

       Some of you know that I was misdiagnosed with Celiacs the week before I left for college. I moved out to Colorado (thankfully the land of people wanting to convert every recipe to gluten free) and started to re-learn food. There were weeks at the beginning I ate a lot of corn tortillas-some of those weeks were because I didn't exactly know everything I could eat, and some of those weeks were because I was to poor to afford ridiculously expensive gluten free bread.
       I was not much of a cook before this time, but due to a series of events in my life, I started to enter the kitchen more. Being gluten free was a big factor. I did not want to go the rest of my life without eating a delicious x, y, or z. (Let's be honest, most gluten free things at the store are less than stellar.) So my task began, and I simultaneously began my journey to trying to learn gluten free and high-altitude baking. In all honesty, it was fun and I'll probably share some of what I learned with you guys another time. However, this is my post in praise of gluten. After about 3 1/2 strict, no slip up, gluten free years, it was discovered that I did not have Celiacs. I went out for a sandwich with crusty, multigrain bread and an almond croissant, and nearly cried with happiness.
        Getting to eat gluten again has been one of the most wonderful discoveries of my life. I still eat things I had not had in years and it is so exciting. I will never, ever, take advantage of the ability to bake and taste test my gluten-filled things because its freaking awesome, and to be honest it gives you a lot more range. There are some things that just cannot be duplicated (phyllo dough, croissants, ect.) gluten free. Getting to eat it and bake with it is a blessing and not something I will ever take for granted.
        I have to tell you guys, two of my favorite things in the world are Bread and Beer. (Yes, capitalized because they are truly almighty food for me!) Yes, I know they make gluten free beer and bread, but it is just not the same. 
        This bread is an ode of my appreciation to being free to be able to eat whatever I would like. It is yeasted, fluffy, and delicious. It is packed with an extremely rich chocolate flavor from Dutch processed cocoa powder, semisweet chocolate chips, and chopped bittersweet chocolate. It is sweet, and decadently creamy to the point where it is like you are almost eating warm ice cream because it seems to simply melt in your mouth. You can put a spot of butter on your piece, but seriously, even on its own-simple, sliced thick, warm out of the oven, this bread is heaven. The soft dough center is like a gentle chocolate pillow and the varieties of chocolate strewed within add a complexity and a serious depth of flavor. This is unlike any bread I have ever had, and it definitely deserves the title of an ode of my appreciation.
Adapted from "Back in the Day Bakery Cookbook" by Cheryl and Griffith Day

Makes one 10x4 inch loaf (you can use a 9x5)

2 1/2 C all-purpose flour
1/4 C Dutch-processed cocoa powder
1/3 C granulated sugar
1 1/4 TSP active-dry yeast
1-11/4 C warm water
6 TBSP unsalted butter, cubed, room temperature
1 TSP fine salt
1/2 C semisweet chips
1/2 C chopped bittersweet chocolate
Granulated sugar for sprinkling
1 TBSP whole milk 
A dash of vanilla extract

Ingredient notes: This loaf is absolutely lovely as is. However, if you wanted to mix it up some, I think the zest of an orange, a TBSP of a hazelnut or raspberry liqueur, a TSP of a fun extract or 1/2 C of nuts would all be wonderful!

1. In the bowl of a stand mixer, fitted with a dough hook attachment, combine the flour, cocoa powder, 1/3 sugar, and yeast. Turn the mixer on low and slowly add in the water to the mixture. (Yours may only take the 1 C so start with that, at altitude it will likely take more. Add the last 1/4 C only if necessary and only as much as is needed to wet the flour mixture). Mix for 3 minutes. Turn off the mixer and allow the dough to rest for 20 minutes.
2. After 20 minutes, add the cubed butter and salt and mix on medium speed until the dough comes together and the sides of the bowl are clean (about 5 minutes) and the dough has developed a sheen appearance. It is sticky and you may need to scrape off the sides once or twice to help it incorporate everything.
3. Turn the speed back down to low and add the chocolate chips, kneading for 1-2 minutes until the chips are distributed. 
4. Turn the dough out onto a floured surface, form it into a round loaf and place it into an mixing bowl coated in a vegetable or canola oil, seem side down. Cover with plastic wrap and allow it to rise in a warm spot for 1 1/2-2 hours, until it has doubled in size.
5. Get out your loaf pan and sprinkle the bottom a small amount of granulated sugar. Next, turn the dough back out onto a floured surface and form in into an 8x6 loaf. With the long side towards you, roll it into a cylinder and place it into the loaf pan, seem side down. Loosely cover the pan loosely with plastic wrap and allow it to double in size again (about 1 1/2 hours). 
    * I placed mine covered in the fridge over night for a slow rise. The next morning I took it out while the oven preheated and allowed it to rise for about 30-40 minutes at room temperature. This is a great option if you do not have time to do it all in one day or what the bread warm in the morning). 
6. After about 1 hour into the second rise, position a rack in the middle of the oven and preheat it to 350F. After the dough has finished rising, remove the plastic wrap. Combine the milk and vanilla extract in a small bowl and stir together. Brush the vanilla milk over the bread and then sprinkle the top with a touch of granulated sugar. 
7. Bake in the oven for 30-35 minutes and then allow the bread to cool on a rack for 30 minutes before inverting. Slice and enjoy some warm! It will last about 3 days, wrapped up. It makes great toast as well :)

Yay, Gluten! Yay, Bread!

Love,
   Boulder Butter