Showing posts with label nuts. Show all posts

Monday, April 28, 2014

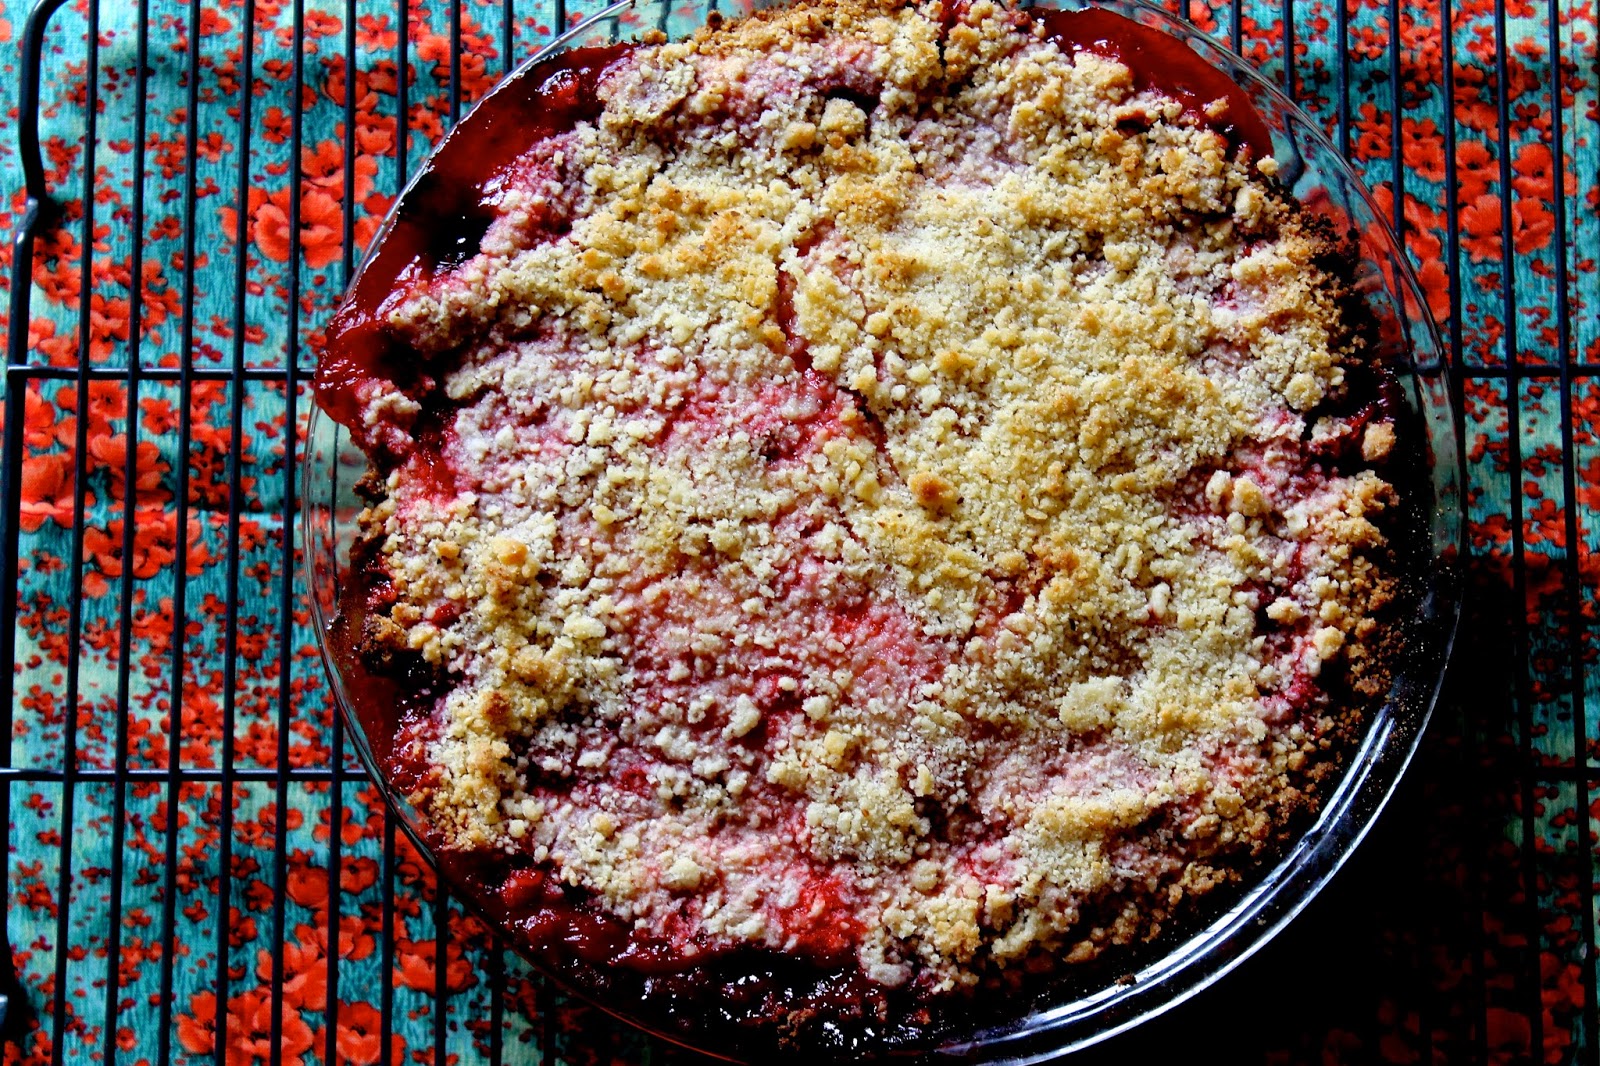
Strawberry Crumb-Packed Pie

   There are a few foods I have been diligently craving lately...kale, avocados, mounds of salsa, carrots (an odd one, I know), peanut butter, and strawberries. Like lots and lots of strawberries. By themselves, on my salads, in biscuits, mixed in yogurt, with lemon curd...pretty much anywhere really. 
    I needed a solution to my addiction. So obviously, I made a strawberry PACKED pie, no room in rhubarb for this one (my apologies rhubarb, you can play later). I wanted a think, gooey, warm filling of small-diced strawberries, and big thick chunks mixed together. 
      Once that was settled, I knew the next step was deciding just what kind of pie I wanted this to be. Since I was indulging my food visions, I figured why would I dare stray away from my ultimate dessert love-struesel. This pie not only is COVERED with a generous topping of crumbles that can only mean love at first pie sighting, but also, the crust is formed by pressing these crumbs into the pie dish so they are also the base.
     I know most of the time if someone told you the important qualities of pie were the struesel and lots of fruit, you would respond-"Don't be silly, just make a cobbler and forget the crust." But I am stubborn and wanted my fruit surrounded everywhere with happiness. So today, I introduce you to The Strawberry Crumb Packed Pie.

Filling
1 3/4 lb. hulled strawberries
1/2 C granulated sugar
2 TBSP cornstarch
Juice and zest of 1 lemon

Crumb Base and Topping
1 C all-purpose flour
1/2 C granulated sugar
1/2 TSP ginger
1/4 TSP salt
1/2 C almond meal (or roughly chopped almonds)
8 TBSP (1 stick) butter, unsalted, room temperature

1. Preheat the oven to 425F (at high altitude) or 400 (at sea level) and place a rack in the lower third of the oven.
2. In the bowl of a food processor, pulse 1 lb. of the strawberries until finely chopped. Using a knife, rough chop the other 3/4 lb. into large chucks.
3. In a medium bowl, mix together all of the strawberries, filling sugar, cornstarch and lemon juice and zest. Set them aside to rest.
4. Clean out the food processor and prepare the crumbs by combining the flour, sugar, ginger, salt and almond meal. Pulse the processor a few times to mix everything together. Cut the butter into chucks and add them to the flour mixture. Pulse the mixture a few times until you have crumbs around the size of large peas. 
5. Scoop half of the crumb mixture into a 9" pie plate and press it into the bottom and edges. (It is sticky, so a wadded paper fowl may help press it down without getting it all over your hands.) Add the strawberries and spread them evenly over the bottom. Sprinkle the remaining crumbs evenly over the pie. 
6. Bake for 35-40 minutes until the filling is oozing out and the top has golden brown bits. Allow the pie to cool for 2-3 hours before cutting. Serve with whipped cream or vanilla ice cream.

*You can do this recipe by hand, but a food processor makes it faster. If you don't have one, just cut the strawberries by hand. Then mix together the dry ingredients in a small bowl and cut the butter into the mixture until you have crumbs.

Love, 
    Boulder Butter

Sunday, February 23, 2014

Chili Lime + White Chocolate Macadamia Bars

     I have been thinking about bars a lot recently. No, not like pull up bars, nor the bars at the trendy ballet classes, or even the bars that fill you with beer and margaritas. I mean, I have been on a complete cake fixation for months, and then about two weeks ago, it hit me- I wanted my dessert to be in bar form. Particularly, brownies were becoming an obsessive thought. How to make the perfect fudgy brownie? I researched and read up on the science of brownies from the classic sources of chocolate knowledge. It was settled; I would go home one night and make a big batch of brownies, open a red wine and relax. 
     I had the chocolate in hand, walked into the kitchen and all of a sudden, I remembered a recipe I had promised to come months ago when my step-mom bought me a bag of macadamia nuts. I had white chocolate. The wheels started to turn. I no longer wanted brownies; I wanted white chocolate macadamia nut bars. I put away the semi-sweet and replaced it with a bag of white. The ideas started to flow...about an hour later, out came these.
      I disregarded all my thoughts of brownies the moment the chili and sugar coated the macadamias and wafted up at me. By the time they came out of the oven, all I wanted was the rich, buttery squares in front of me. The macadamias are toasted in butter, sugar, and chili and achieve a rich creaminess of their own. They provided the perfect amount of buttery crunch, with tingles of chili in every bite. Occasionally, you get a stronger chili-punched mouthful, but its softened and sweetened by the white chocolate melted throughout. The small chips allow the flavor of white chocolate to never overpower, but only hold in check all the strong flavors vying for your attention. Balancing the bar with their unique sweetness.
     The lime adds a bright fun flavor with the same sensation of the chili-prevalent in every, bite but with strong burst hidden throughout. The chili and lime create a competing warm and cool liveliness on your tongue, dancing around in the sweet, the butter, and the hints of salt. Although this is technically a Blondie, the browned butter yields a dark colored bar. It ups the creaminess significantly and adds a nutty richness. I mean honestly, it does what browned butter does best-just makes everything so much freaking better. These are not as chewy as a traditional Blondie, but they are not at all cakey. Instead they mirror their cousin, the cookie, more than I realized was even possible in a bar. I did not realize what that could be until I made these. They are delightful-so delightful and addictive, I made them twice in four days. I admit to that proudly. 
Inspired by the Beekman 1802 Heirloom Dessert Cookbook's "White Chocolate Macademia Nut Blondies" 

Ingredients
1 C flour
1/2 TSP baking soda 
1/2 TSP salt
1/2 C (1 stick) butter + 1 TBSP
1 egg
3/4 C brown sugar 
3/4 C macadamia nuts 
3/4 C white chocolate chips (mini are great)
1 TSP sugar (or brown sugar)
1 1/2 TSP chili powder*
Zest of one lime 

*You can use 1 TSP to 2 TSP depending on your palate preferences and the freshness of your chili powder. If it is brand new, then go lighter, if it is older, you can use the larger amount. 

Instructions
1. Preheat the oven to 350 F and prepare and 8x8 pan by lining it with aluminum foil and oiling it. 
2. Place the macadamia nuts, chili powder, 1 TSP white sugar, and 1 TBSP butter in a pan, until the butter is melted, the nuts are toasted and the sugar and chili powder caramelize and coat the nuts. The mixture will be fragrant of sweet chili.
3. Remove from the pan and place in a separate bowl to cool. 
4. Wipe out the pan and return it to medium heat on the stove. Add the stick of butter and melt then cook over medium heat until foam forms, goes away and the butter browns to a nutty color and aroma. Pull immediately, move it into another bowl and whisk to cool it quickly and prevent from further cooking. 
5. In a separate bowl, whisk together the flour, baking soda, and salt.
6. Add the brown sugar to the butter and mix until combined.
7. Gently mix together one egg to break the yolk and then stir it into the butter and sugar. Be careful not to over mix here as these bars are prone to a lot of air and you want to avoid creating a meringue effect with an over beaten egg. 
8. Stir in the flour mixture, followed by the nuts, white chocolate, and lime zest. The batter will be dark from the brown butter and a thick, sticky mass.
9. Dump the dough into the pan and spread it out with your fingers to an even top. 
10. Bake for 25 minutes, remove from the oven and allow cooling for 10 minutes before taking the bars out of the pan. Allow cooling for 10 more minutes, then cut into squares using a sharp knife or pastry cutter.
Love,
   Boulder Butter 

Wednesday, July 3, 2013

Chia Coconut Granola


          Whew, what a wonderful couple of days since my last post! Best of all, I got to go camping with my funky friends, up in a beautiful site by Moffet Tunnel near Rollinsville, CO. The morning we left for camping, I was trying to figure out what was the best camping and summer food for our hike-in trip. Obviously, I settled on granola (if that was not obvious to you, let me tell you why it should have been...eh-hem) Granola is the greatet morning treat. Baked to crispy, crunchy or chewy perfection, good by the handful, with milk or yogurt and formed in endless combinations, granola and I have a summer fling love-affair. Especially when it comes to spending time in the great outdoors, we bond stupendously. I've got to be honest, there is something indescribably pleasant about a summer morning started with granola and fresh mountain air.
         
           Disclaimer: Everything tastes better when you have backpacked into a campsite and just spent the past 10 hours trying to sleep on rockzilla (Don't worry, by the end rockzilla and I were part of a totally understanding human-nature relationship and the granola was still good after I was back and rested, so both of those statements should not cause you to fear my views of nature or this granola.)
          My preference notes: Since produce in the summer is in such an abundance, I find it a shame to put dried things in my granola and not take advantage of the season that is upon us. Due to the time of the year then, I did not put dried goods in this, but rather served it with milk and a fresh, juicy peach. If you do care for dried fruit, just add that after you’ve removed the granola from the oven, as it cools off. I also heavily spiced this one. Personally, I like it how it upped the savory notes and added tons of depth. Others might not want to go as heavy handed...feel out how you like spices and adjust accordingly. 

          On a healthy living and mouth watering temptation note: This granola has a nice crunch, created by the egg whites, which add an extra protein source to fuel your morning. More importantly to me, is how it is extremely superfood-filled (casual foodie lingo for coolness points). Seriously though, packed with chia seeds, flax, oats, and multiple nuts, this granola is a natural body-supporting power house. If you top it with some fruit, you have likely added another superfood! Not to mention, all of these things add up to one heck of a fiber dosing to keep you full on your morning hike...or commute, which you dream about hiking during. Finally, cinnamon and ginger are gifts to your system. The first helps regulate blood sugar and fight diabetes, along with a myriad of other things. Ginger, is a tasty anti-inflamatory (inflammation of various areas is the source of the majority of American's health issues, so this is key). Finding ways to add these spices to your food is great, and granola is just one simple way to get them in. The possibilities with granola are vast, and I love it. This one is WONDERFUL, not overly sweet, and very lightly oiled.
 
       So weather you're sitting at you kitchen table or perched on a rock in the great outdoors this Fourth of July weekend, make something good for you and your friends or family. A cheers to good health America- here is to taking care of the health of nature and our bodies so we can enjoy both throughout our lives, and our future peeps can too!
Because no one should have to miss this!
Oven Temp: 300 F

Ingredients:
3 C rolled oats
½ C shredded, unsweetened coconut, if needed, pulse in food processor to get to desired size
1 ¼ C mix of nuts (almonds, walnuts, hazelnuts) roughly chopped or run through a food processer
¼ C chia seeds
½ TSP salt
1 TBSP cinnamon
1 TBSP ginger
3 TBSP ground flax seed
2 TBSP coconut oil
2 TBSP honey
2 TBSP maple syrup
2 egg whites (approx. 4 TBSP)

Instructions: 
1. Preheat oven to 300F


2. Mix the rolled oats, coconut, nuts, chia seeds, salt, ginger, cinnamon, and ground flax in a large mixing bowl.
3. Add the oil, honey and maple syrup and mix until the oat mixture is evenly, lightly coated.
4. Whisk egg whites in a mixing bowl until frothy, pour over granola and mix to coat.
4. Spread granola onto a cookie sheet (lined with a Silpat or parchment paper)
5.Bake for 20 minutes, stir around and let bake for another 25 minutes. For a total or 45-55 minutes. Remove when the granola starts to brown and transfer it to a cool rack to prevent further cooking.
Cooled, Sealed Up and Ready for the Pack.
*Let it cool, you can store this in an airtight container for 1-2 weeks

Stay happy.