Showing posts with label summer. Show all posts

Wednesday, March 12, 2014

Blackberry-Lavender Cobbler

    The clock sprung forward and Monday night was a promise of a sweet, sweet spring and summer ahead in Denver. The sun was beaming and perfect for an early evening walk. The darkness did not come until later, and the night demanded cheesy grits with greens, a cold beer, and a nice warm cobbler. 
     Granted I had intended to make something completely different for my next post, but when I walked in the store that day and saw these juicy, beautiful blackberries sitting there, I knew it was time for a cobbler instead. 


    The berries are mashed together with ground lavender leafs. The center is a gooey and sweet, but the lavender pushes through a strong floral flavor with the slightest bitter notes. Each bite makes me feel like I am sitting in the middle of a field in the summer with the sun beating down. The filling taste like the most wonderful flavors of the earth and it's abundance. 
      There are many types of cobbler. This one, is what I have so eloquently named "a dumb cobbler" and it is the true type of my heart. The messy filling coupled with the caramelized, cakey surrounding screams sweet simplicity in a skillet. The buttermilk adds the quintessential southern tang; the molasses in the brown sugar creates an eye catching dark color and simultaneously chewy and crunchy texture on the outside that is divinity in cast iron. The inside is soft and comforting as it melds into one where it meets the berries.
    Cobblers are a messy scoop of heaven. I love them hot out of the oven, scooped impatiently and topped with vanilla ice cream that melts down the sides. I love them equally for breakfast, reheated, with milk poured over them (cereal never stood a chance). I had gingerbread to get me through the winter, but now I have this. Welcome back, Spring, how I have missed you.
**Notes: For the lavender you can use a mortar and pestle, a spice grinder, or if you have too, just run a knife through them to mince them for a bit. I use a 10" cast iron skillet for this recipe. If you do not have a cast iron skillet, in step two: instead prepare a 8x8 baking dish or 8-9" cake pan, and melt the butter in the microwave or in a separate sauce pan. 

Inspired by Virginia Willis' "Meme's Blackberry Cobbler" in Bon Appétit, Y'all-this book is a recent, but total obsession of mine!

Ingredients: 
1/2 C butter (1 stick), unsalted
4 1/2 C fresh blackberries (I used 3, 6 oz. containers)
1 1/2 TSP dried lavender flowers, ground* see notes
1 C all-purpose flour
1 C brown sugar + more for sprinkling 
1 TSP baking soda
3/4 TSP baking powder (at altitude) OR 1 TSP baking powder (sea level)
1 generous pinch fine sea salt
1 C buttermilk
1/2 TSP vanilla extract
1/2 TSP almond extract (or 1/2 more vanilla if you don't have this)

Instructions
1. Preheat your oven to 350 F.
2. Melt your butter in a large cast iron skillet and remove from heat. **See notes. 
3. Add the blackberries and ground lavender to a large bowl and sprinkle with a small amount of sugar. Using a potato masher, forks, or pastry cutter, mash the berries so some of the juices have been released but there is still form in some of them.
4. Whisk together the flour, baking powder and salt. Next stir in the brown sugar, breaking up the majority of the clumps before continuing. 
5. Mix in the buttermilk, then the extracts and finally the butter until the batter is smooth. Pour the batter into the cast iron skillet. Add the mashed berry mixture to the center.
6. Bake for 45-50 minutes. Remove and let it cool for 30 minutes before serving. Goes perfectly with ice cream or whipped cream-the lavender begs for one of those! Vanilla is perfect, and if you can find honey flavored I can only imagine it would be heavenly. 


The best part-since it is so PACKED with berries, it makes it really easy to eats huge spoonfuls of it. I love anything sweet I get to huge spoonfuls of! 

Love,
Boulder Butter    

Friday, September 6, 2013

Plum Custard


         I have recently been feeling a lot of nostalgia for my southern roots. Particularly, when it comes to food. I was not really "into" food when I lived in the South. I mean, I really enjoyed it, and I was always happy to eat it, but I did not start to nerd out to food until college. Since then, I have not spent an extended amount of time back home. Recently however, the south has captivated me in its food culture and traditions, and I have been longing to go back and do a food tour, especially around Georgia. I mean how cool would it be to go and drive around the state looking for the best flavors it has to offer? Not saying this will happen anytime soon, but it is something I have become mildly obsessed with over the past few months. One of the places I would definitely include on such a tour is the Back in the Day Bakery in Savannah, Georgia.

        A Back in the Day Bakery cookbook  was published about a year and a half ago and from the moment I saw it on the shelf, my eyes widened with a desire to bake everything in it. A few months later, I saw it on my step-mom's counter when I was home, and again I was filled with the same longing. Finally, I have acquired my very own copy. I instantly looked through the recipes and went into the kitchen the moment I had to time to enter my happy place!
         When I asked my step-mom, Bam, what she had felt about the book, she said it held flavors of comfort for her. It is old-time food with classic, dependable, delicious southern charm. Bam was the most kitchen oriented family member I had growing up, and really most of my deep food memories of childhood come from her kitchen and cooking. I still dream of her monkey bread on Christmas morning :) She love to try new foods for us and there were many fun dishes that came from her hard work in the kitchen. So when I was looking through the book and deciding what to make first, I went with this recipe because custard is one of her particular favorites. With the overwhelming nostalgia I have been feeling the South, my own home, and childhood food memories created by Bam, I thought there was no better place to start working through the book, than to pay a small homage to one of the people that inspired me in the kitchen long before I knew it. 

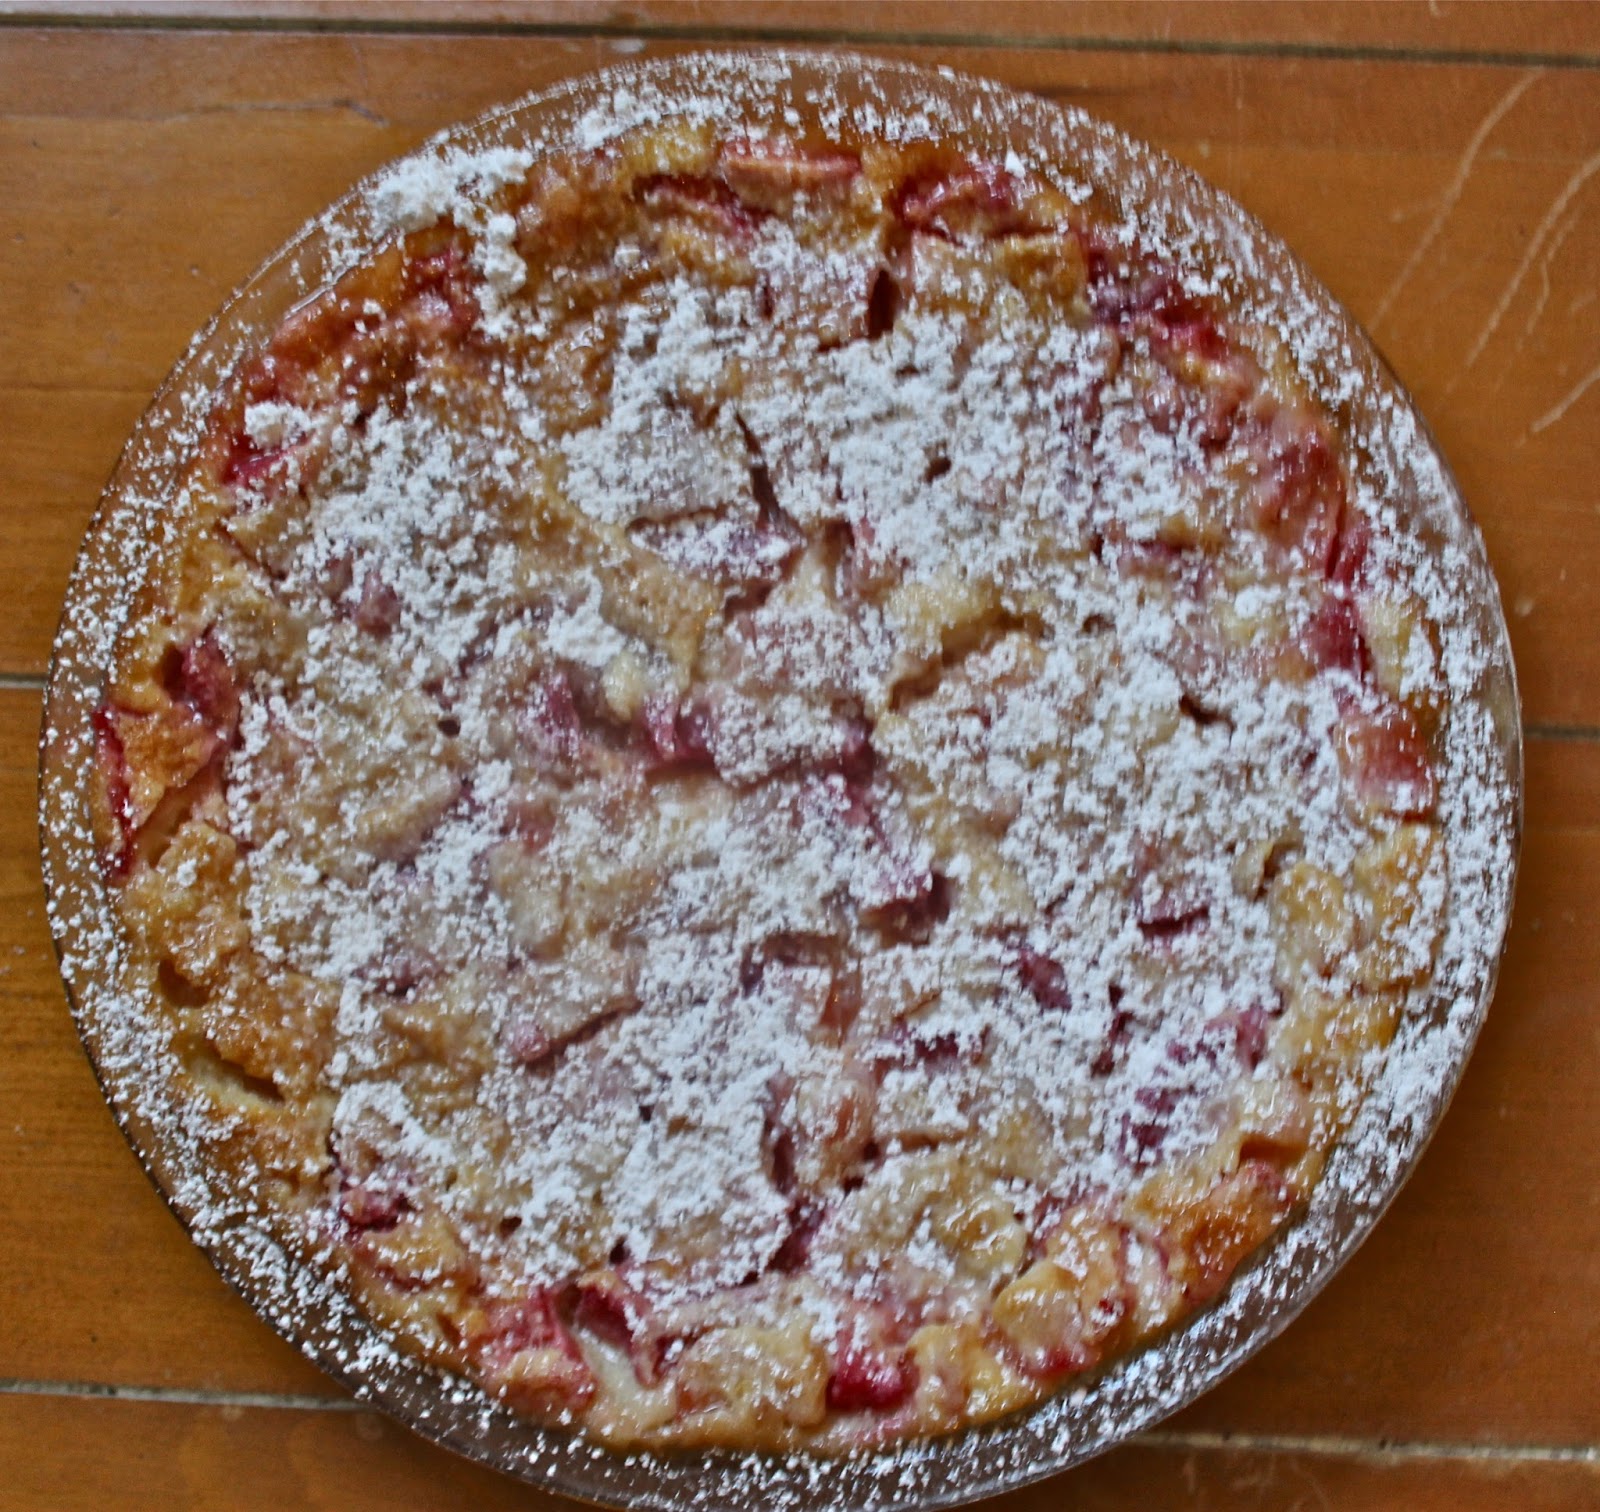
        This is an awesome recipe because it is essentially a foolproof custard. You do not have to scald the cream mixture first and there is no tempering of eggs. It is as simple of baked custard as you are going to get to make, yet the flavor and texture is in no way compromised. It is rich and creamy, with a smooth mouth feel. The juicy plums made it bright with a fruity sweetness, and the cool temperature made it refreshing to eat. It is perfect for a light pick me up on a hot afternoon yet rich enough for after dinner treat. It is particularly wonderful with the addition of the whipped cream, which achieves a balance of varying delicate textures studded with the bursts of plums throughout each bit. Its one of those desserts you can easily go back for seconds...and you will. So please, please take advantage of the plums in season right now, and put them in this creamy dessert, sure to please your palate and put a smile on your face.
Adapted from Back in the Day Cookbook by Cheryl and Griffith Day

Oven Temperature: 350 F

Equipment: 9-inch pie plate

                     Hand or stand mixer

Ingredients:
4-5 small to medium plums, peeled, pitted and cubed
4 large eggs, separated (keep whites cold until ready to use)
1 C sugar
1/2 TSP fine salt
2 TBPS unsalted butter, melted
1 TBPS all-purpose flour
1/2 TSP vanilla extract
1/2 TSP almond extract
1 C whole milk, at room temperature
Optional:
Powdered Sugar for Dusting
Whipped Cream for serving
Instructions:
1. Preheat oven to 350F and position rack in lower third of oven.
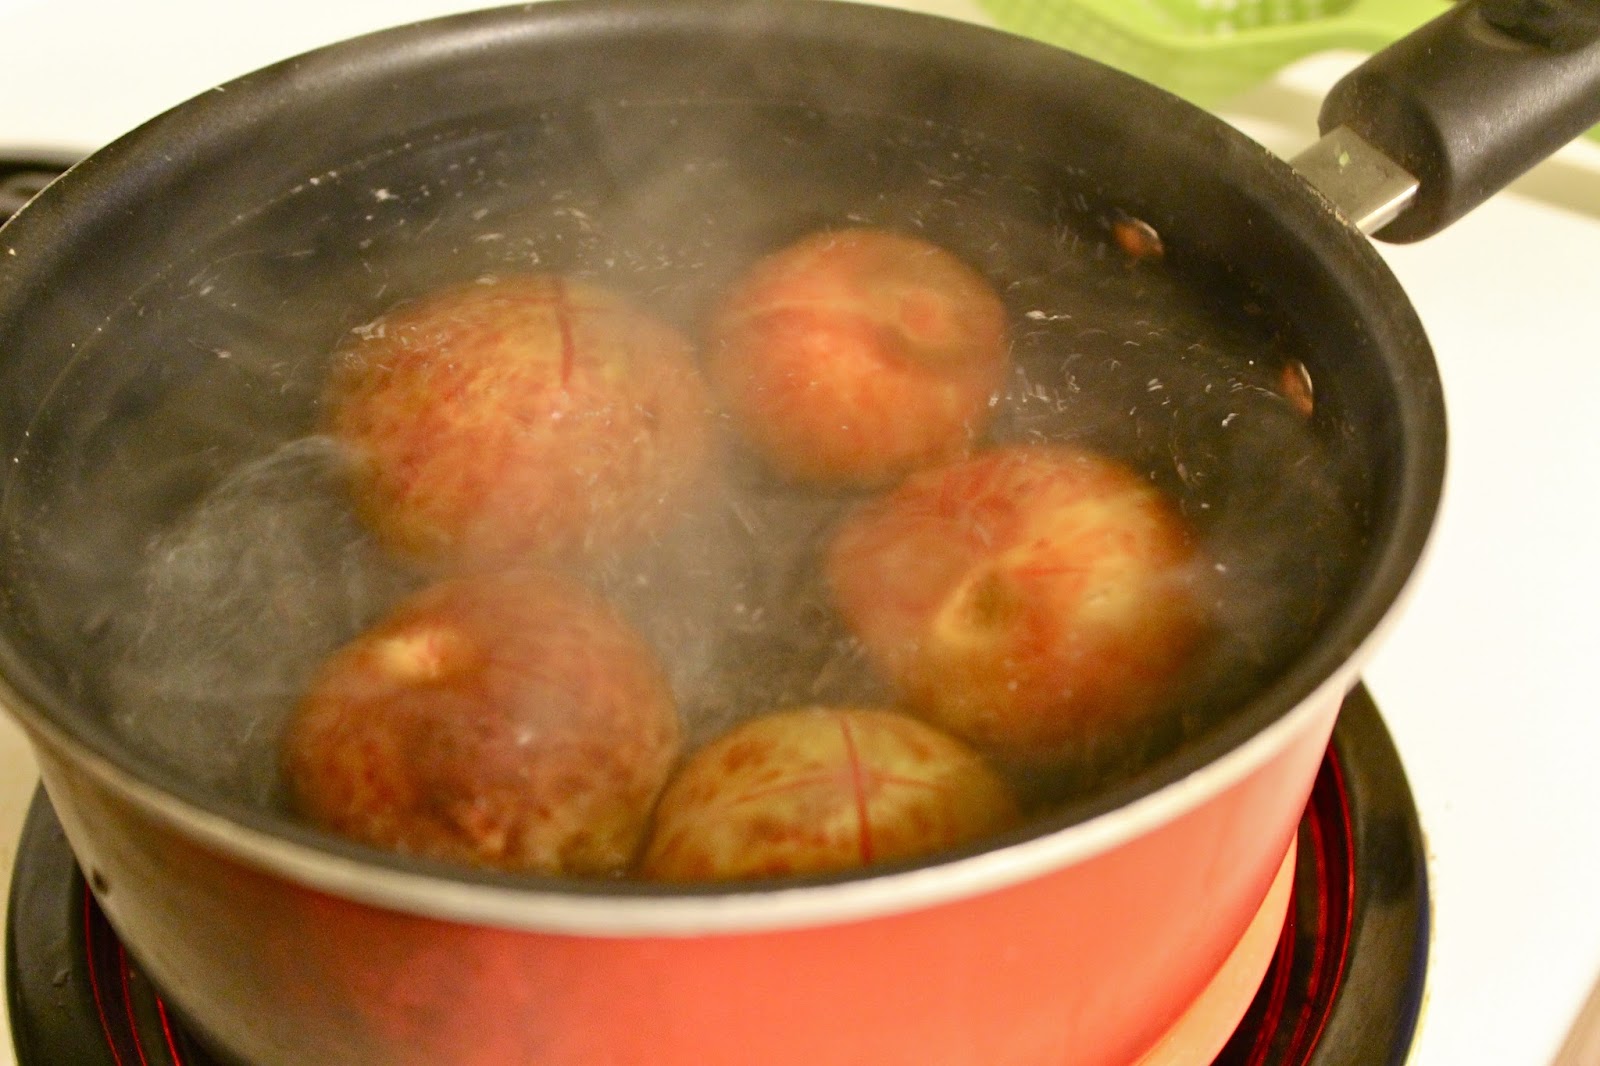
2. To prepare the plums: Bring a pot of water to a boil. Cut small crosses on the tops and bottoms of the plums. When the water is boiling, drop the plums into the pot for about 60 seconds (you will see the skins begin to peel back. The time may vary depending on ripeness so watch them and pull when you see this effect.) Transfer plums into a bowl of ice-cold water. Remove plums and you should now be able to easily peel the skins off just with your hands. Cut around the pit, remove flesh and cube the plums into small pieces.
3. Line the bottom of the pie dish with the plums in a generous layer (about 1/2 way up the side of the pie plate).
4. In a medium bowl, whisk together the egg yolks and sugar until blended.


5. One at a time, add the salt, melted butter, flour, extracts, and milk, whisking thoroughly between each addition until the ingredients are combined.
6. Using a stand or hand mixer, whip the egg whites on a high speed until soft peaks have formed. Watch carefully, as whites can go through the stages of whipping very quickly.
--A soft peak will have a white and slightly glossy appearance. When you lift your whisk with some of the mixture, it will have a peak, but it will fall over to the side.
7. At a lower speed, whisk in the egg yolk mixture until it take on the look of a light custard (about 2 minutes, but again watch during the process and look for that custardy appearance.)
8. Pour the custard over the plums and bake for 30-40 minutes, until the edges are set, there is slight browning on top and the middle still jiggles just a little.
9. Remove from oven and allow the custard to cool.
10. Just before serving, dust with powdered sugar and top with a small scoop of whipped cream.
Making whipped cream: This is always worth the minimal effort it takes to make fresh whipped cream at home. It is so significantly better every time and so easy.
Simply combine 1 C of heavy whipping cream, 1-2 TBSP of powdered sugar, and a splash of vanilla extract. Beat with a hand mixer until you have achieved stiff peaks and dollop the finished product on top of your dessert.
Happy Baking Folks!
P.S. Fun fact about me: I really love plums! They are beautiful and delicious. 

Sunday, June 16, 2013

Vanilla Lemon Cookies

              I absolutely love cookies. Every kind, during every time of the year, for any occasion. The cookie is one of the most perfect packages of sweetness in the world. With summer in the air, and the heat at crazy highs, I wanted to create a refreshing cookie. I wanted something that would be a scrumptious afternoon nibble while you sit on your porch and sip on ice tea. (Yes, in my mind we all have porch sitting time, which is easily as important as breakfast time). This led to the creation of the Vanilla Lemon Cookie. The cookie itself is moist with a slight crumble and a smooth vanilla flavor. It is reminiscent of a vanilla wafer, but infinitely kicked up by its added lemon zest and homemade quality. However, the best part is easily the delicate lemony glaze! Its tart and balances the cookies so wonderfully, while adding a slightly crunchy outer layer before you sink your teeth into the soft cookie center! This is a wonderful summer cookie and made with ingredients usually already in your pantry, so go ahead and whip it up this afternoon.
Cookie Ingredients: 
1/2 C Butter, room temperature
1/2 C Sugar 
1 Egg
1 TBSP Vanilla Bean Paste (or Extract or 1 Vanilla Bean scraped)
Zest of 1 Lemon
1 C Flour
1/4 TSP salt

Oven Temp: 350 F

Directions:
1. Add the room temperature butter and sugar into a mixing bowl and beat with a hand mixer, until creamed. It will appear, light yellow and fluffy. Make sure to cream to this point. This is why its very important you start with room temp butter! Properly creaming the butter is the key to well formed cookies. These are what your step one should look like when you stop.
2. Mix in one egg
3. Mix in Vanilla Paste and Zest 


*Vanilla Bean Paste is a favorite product of mine! You can see the vanilla bean flecks without having to buy the pods. It adds a beautiful touch to your baked goods. Not to mention, the flavor is absolutely delicious.
4. Mix together the flour and salt and add them to the wet mixture in two batches.
Adding second half of flour mixture.
5. The second key to a good batch of cookies, is allowing them rest time. So wrap the batter up and let it  sit for a few hours or overnight in your fridge! I mean it.
6. After the rest time, scoop them out onto a cookie sheet and get them into the 350 F oven. Let them bake for 15-16 minute. Watch carefully in last minute. They are done when the edges are golden. 
Use an ice cream scoop for even sizes.
Icing Mixture:
Whisk together the juice of one lemon and 2/3 C of powdered sugar.
7. When the cookies have cooled, set up your icing station.  I placed my cooling rack on top of my sheet tray so excess icing could drip below.
8. Dip each cookie into the mixture, turn over to cover all sides, lift and allow the excess to drip off.


These guys were gobbled up in no time! 
Happy Summer and a very Happy Father's Day-especially to my dad, who would happen to adore these cookies. I love you :)